This article describes how to create a website that contains a collection of Distill articles. Distill websites include a top level navigation bar that enables readers to discover and browse articles. For example, the documentation pages you are reading now are a Distill website.
Once you’ve created your website locally, there are a variety of ways available to publish your site to the web.
Getting started
Website or blog?
Structure difference: Websites are just collections of pages you can navigate to via the menu, whereas blogs have collections of posts that can be indexed and syndicated (via their RSS feed). Distill blogs are a distill website with added blog posts.
Workflow difference: Furthermore, website pages and root pages of blogs are re-rendered when the site is rebuilt but blog articles are not. Each blog article has to be rendered on its own, with intent. Why? Given that R package upgrades have a tendency to break older code, continuously re-rendering old posts is nearly impossible to do without errors, especially over longer periods of time.
Creating a website
If you are using RStudio, the easist way to get started is to use the Distill Website option in the RStudio New Project dialog:
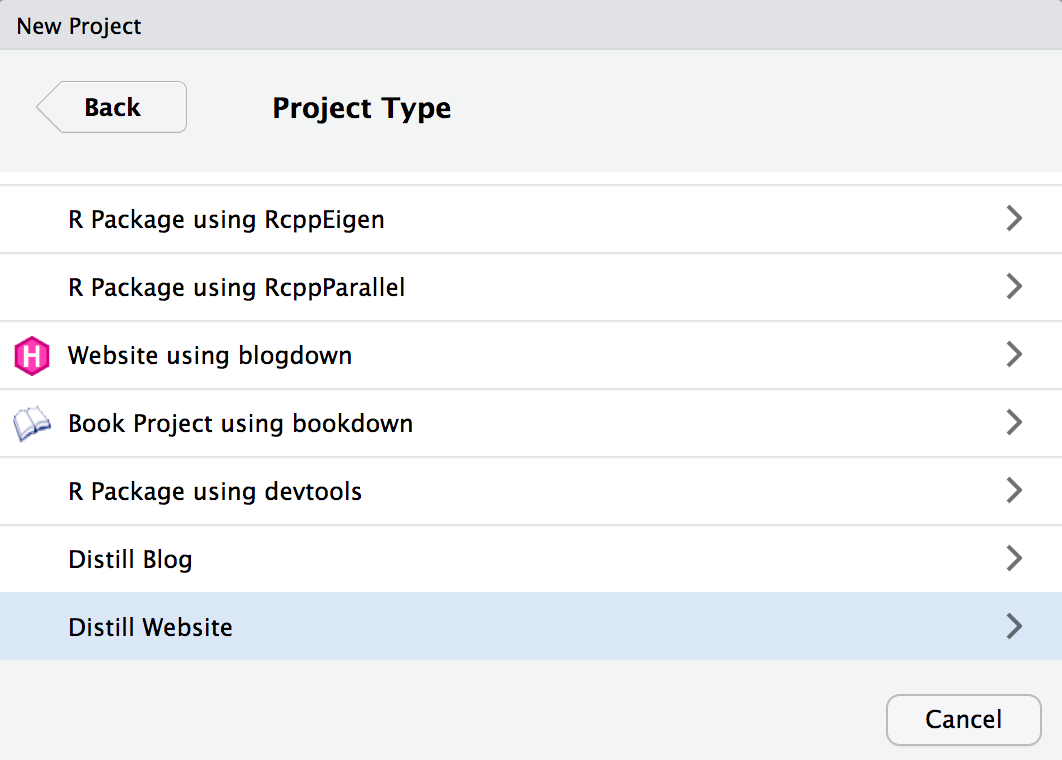
A new RStudio Project for the website will be created and opened. The website will include the following files:
| Option | Description |
|---|---|
_site.yml |
Website configuration file. |
index.Rmd |
Website home page. |
about.Rmd |
Website about page. |
If you are not using RStudio you can also call the Distill create_website() function:
library(distill)
create_website(dir = "my-website", title = "My Website")
A new website containing Home and About pages will be created within the my-website directory.
Authoring articles
When you use the RStudio Knit command on a Distill article within a website, only that article will be rendered and previewed:

You can also preview a single article from within a website by passing the name of the article’s Rmd file to render_site():
render_site("about.Rmd")
This will build only the specified article (as opposed to all articles in the site). This the recommended workflow for authoring articles since it offers the fastest turnaround time for previews (since only the article you are working on is rendered).
Building the site
After you’ve authored the various articles contained within the website you will want to build the entire site before deploying it.
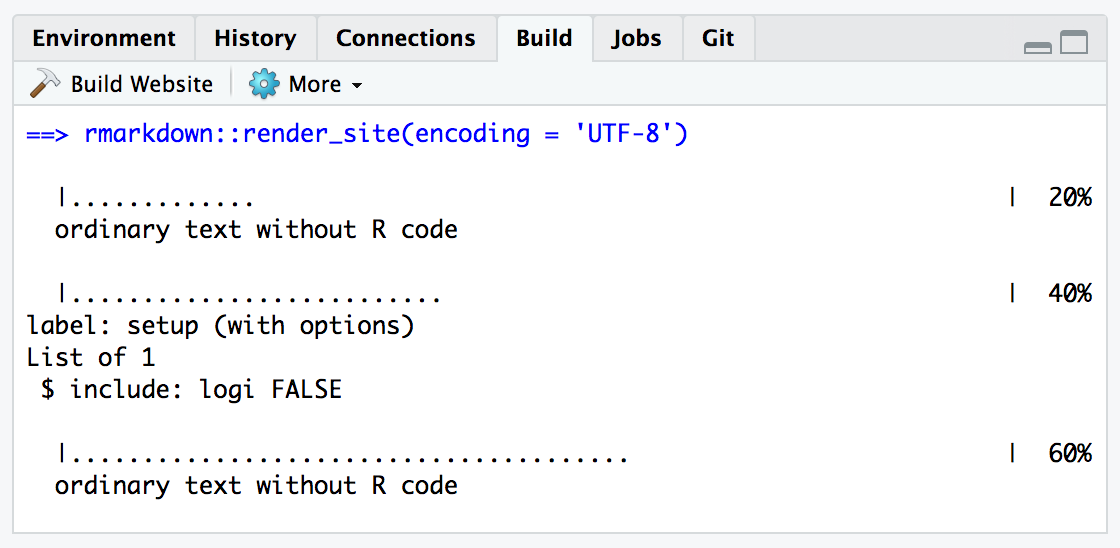
If your Distill website is contained within an RStudio project you can use the Build Website command available in the Build pane to generate the site:
When you build a website, the following things occur:
All of the Rmd and md files in the root website directory will be rendered into HTML. Note however that markdown files beginning with “_” are not rendered (this is a convention to designate files that are included by top level documents).
Blog posts will be copied into the
postssub-directory of the output directory and blog listing pages will be re-generated.The generated HTML files and any supporting files (e.g. CSS and JavaScript) are copied into an output directory (
_siteby default).
The HTML files within the _site directory are now ready to deploy as a standalone static website.
To build a website from the command line, use the rmarkdown::render_site() function:
Site output
The _site.yml file has a number of options that affect site output including where it is written and what files are included and excluded from the site. Here’s an example that makes use of a few of these options:
_site.yml
The name field provides a suggested URL path for your website when it is published (by default this is just the name of the directory containing the site).
The output_dir field indicates which directory to copy site content into (“_site” is the default if none is specified). Note that this can be “.” to keep all content within the root website directory alongside the source code.
The include and exclude fields enable you to override the default behavior visa-vi what files are copied into the output directory. By default, all files within the website directory are copied into the output directory (e.g. “_site”) save for the following:
Files beginning with
"."(hidden files).Files beginning with
"_"Files known to contain R source code (e.g.
".R",".s",".Rmd"), R data (e.g.".RData",".rds"), or configuration data (e.g."rsconnect","packrat")).
The include and exclude fields of _site.yml can be used to override this default behavior (wildcards can be used to specify groups of files to be included or excluded). Note that the include and exclude fields target only top-level files and directories (i.e. a directory is either included or not, you can’t exclude a subset of files within a directory).
Note also that include and exclude are not used to determine which Rmd files are rendered (all of them in the root directory save for those named with the _ prefix will be rendered).
The R Markdown documentation on creating websites has documentation on additional available features and configuration options. The remainder of this article describes features that are specific to Distill websites.
Site navigation
Site navigation bars include the site’s title, an optional logo, top-level links to articles, and if need be drop-down menus that include links to several articles. For example:
Elements of the site navigation bar are specified within the navbar section of the _site.yml file. For example, here is the YAML that was used to create the navigation bar displayed above:
---
name: "distill"
title: "Distill for R Markdown"
navbar:
  logo:
    image: images/logo.png
    href: https://www.rstudio.com
  right:
    - text: "Figures"
      href: figures.html
    - text: "Tables"
      href: tables.html
    - text: "Citations"
      href: citations.html
    - text: "Publish"
      menu:
        - text: "Publishing Articles"
          href: publish_article.html
        - text: "Publishing a Website"
          href: publish_website.html
        - text: "---"
        - text: "Article Metadata"
          href: metadata.html
    - icon: fab fa-github
      href: https://github.com/rstudio/distill
output: distill::distill_article
---
Note that we specify that the menu items appear on the right side of the navigation bar. We could have also used left, or chosen to put some items on the left and some on the right.
Note also that we used an icon for one of the menus, specifying the Font Awesome fab fa-github identifier for the GitHub icon (you can use any Font Awesome icon). If there isn’t a Font Awesome icon that matches the image you want, you can also specify a custom image rather than an icon.
Site search
You can add a search box to the navigation bar using the search field of the navbar key within _site.yml. For example:
---
name: "distill"
title: "Distill for R Markdown"
navbar:
  logo:
    image: images/logo.png
    href: https://www.rstudio.com
  search: true
---
Note that only articles with a description metadata field are included within search results. Also note that search is enabled by default for blog sites.
Source code
If you want to display a link to the source code for your website on the navigation bar, add a source_url field to the navbar definition. For example:
---
name: "distill"
title: "Distill for R Markdown"
navbar:
  logo:
    image: images/logo.png
    href: https://www.rstudio.com
  source_url: https://github.com/rstudio/distill
---
Note that if you’ve already defined a repository_url field in _site.yml you can just use source_url: true and your repository_url will be used for the link.
Site footer
When you use a navigation bar, you can optionally also include a site footer which uses the same theme (background and foreground colors). For example:

To add a footer, simply include a file named _footer.html within your main site directory. For example:
_footer.html
© Copyright 2018 [The Distill Template Authors]
(https://github.com/distillpub/template/blob/master/AUTHORS)
and [RStudio, Inc](https://www.rstudio.com).

Software licensed under the [Apache License, v2.0]
(https://www.apache.org/licenses/LICENSE-2.0).
Theming
You can use CSS to create an alternate theme for your navigation bar and site footer. Here is the CSS used for the default appearance:
.distill-site-nav {
  color: rgba(255, 255, 255, 0.8);
  background-color: #455a64;
  font-size: 15px;
  font-weight: 300;
}

.distill-site-nav a {
  color: inherit;
  text-decoration: none;
}

.distill-site-nav a:hover {
  color: white;
}

.distill-site-header {
}

.distill-site-footer {
}

@media print {
  .distill-site-nav {
    display: none;
  }
}
The distill-site-nav class addresses both the header and footer, whereas the distill-site-header and distill-site-footer apply (respectively) to just the header and footer.
To override all or part of this CSS, simply include a styles.css file in the main site directory and add a reference to it within your site output options. For example:
_site.yml
name: "distill"
title: "Distill for R Markdown"
navbar:
  # (navbar definition here)
output:
  distill::distill_article:
    css: styles.css
Google analytics
You can add Google Analytics to your website by adding a google_analytics tracking ID to your _site.yml file. For example:
_site.yml
name: "distill"
title: "Distill for R Markdown"
base_url: https://rstudio.github.io/distill
google_analytics: "UA-77306155-2"
navbar:
  # (navbar definition here)
output: distill::distill_article
The Google Analytics tracking code will be automatically included on all pages of your website.
Site metadata
Distill articles can include various types of metadata to make them easier to index, cite, and share. Metadata included within your _site.yml file is conveniently shared across all articles on your site (individual articles can always override any value within their own metadata).
Several metadata values which you might find useful to define in _site.yml are:
| Metadata | Description |
|---|---|
base_url |
Base (root) URL for the location where the website will be deployed (used for providing preview images for Open Graph and Twitter Card). |
repository_url |
URL for the source code of your website. Used to create a navbar link back to the repository and to create a Corrections appendix. |
creative_commons |
Creative Commons license terms for website content. Used to automatically generate a Reuse appendix. |
license_url |
Alternate licensing terms for website content if not using a Creative Commons license. |
favicon |
Favicon (image file) to use for browser tabs/bookmarks |
twitter |
Site handle for Twitter Card metadata |
Here’s a _site.yml file that uses all of these fields (save for license_url since the license is already specified via creative_commons):
_site.yml
name: "distill"
title: "Distill for R Markdown"
favicon: images/favicon.png
base_url: https://rstudio.github.io/distill
repository_url: https://github.com/rstudio/distill
creative_commons: CC BY
twitter:
  site: "@distilljournal"
navbar:
  # (navbar definition here)
output: distill::distill_article
Be sure to enclose Twitter account names in quotes (this is required because they start with @).
Publishing a website
Website content is by default written to the _site sub-directory (you can customize this using the output_dir metadata field). Publishing is simply a matter of copying the output directory to a web server or web hosting service.
See the article on publishing websites for additional details on publishing sites using a variety of available hosting services.